Showing posts with label Challenge: Die Cuttin' Divas. Show all posts

Monday, February 6, 2012

Fantabulous Cricut: Challenge Me Monday #97 - Love Is in the Air

Today I get to share with you a very special card -- my hubby's valentine!  He promised not to check my blog so I can post it before Valentine's Day and for Fantabulous Cricut Challenge Me Monday #97 - Love Is in the Air.  (So, hubby, you better not be reading!)

Our sponsor this week is K Andrew Designs Art Stamps, and she shared with the design team some awesome stamps to complete our "love" projects.  I received this Mini Heart set with both sentiments and images:


And here's what I created:

Card Details:
  • Card Base - Paisley, page 28 (Card Function) @ 4.5 inches
  • Papers - pattern by K&Company; cardstock by Recollections
  • Cricut Cuts - hearts from Doodlecharms, page 26; tag, frame, and "heart" sentiment from Lovely Floral
  • Embossing - frame with Cuttlebug's Kassie's Brocade
  • Other - stamped sentiment by K Andrew Designs; key by Recollections; inking with red Colorbox ink pad, and brown and pink Stampabilities ink pads; ribbon and glitter from stash; tag and hearts on pop dots

I'm so proud of this card -- it's my first shaker card!  The photo doesn't capture it well, but the heart has a piece of recessed plastic that encloses both the key and lots of red glitter.  My inspiration -- and tutorial -- for making a shaker card with the Paisley cartridge came from a video at Above Rubies Studios.

Would you like a chance to win some K Andrew stamps?  Join us at Fantabulous Cricut with your "love" projects this week for a chance to win!

I'm also submitting this project to the following challenge(s):

CardzTV: Cricut Cardz Challenge #101 - Valentine's Day
Die Cuttin' Divas: Challenge #50 - Anything Goes
My Sheri Crafts: Challenge #78 - Love Is in the Air
Paper Playtime: Challenge #67 - Hearts or Love Theme

Monday, December 19, 2011

Fantabulous Cricut: Challenge Me Monday #91 - Trimming with a Tag

It's almost Christmas..!!  Are you just as excited as me...?!  Our family has been busy with our favorite holiday outings and traditions -- and also nursing my little guy through a four-day fever -- but I did have time to make a few tags for this week's Trimming with a Tag challenge at Fantabulous Cricut.

I made these Baby Jesus gift tags to decorate the wrapping for my son's Sunday School teachers' gifts.  It's hard to find gift wrap and trimmings that relate the holiday back to Christ, so I enjoyed making my own packaging to acknowledge God's Perfect Gift.  (Jesus, that is -- not Bath & Body Works.)


Here's a closeup of a tag:


Project Details:
  • Paper - cardstock by Recollections; green patterned paper by Me & My Big Ideas
  • Cricut Cuts - baby Jesus and star from Winter Folic, page 71; tag from Winter Frolic, page 70
  • Embossing - manger with The Paper Studio's Wood Grain; swaddling clothes with Cuttlebug's Distressed Stripes
  • Other - inking with yellow and light green Colorbox ink pads; doodling with white Gelly Roll pen; baby Jesus and star on pop dots

I'm totally loving how they turned out -- and now wishing that I'd made tags for all the gifts under the tree.  Oh well, maybe next year. :)  Yes, along with 50+ handmade Christmas cards.  (I have very high hopes for 2012, eh?)

Have you made a fun tag this season?  Or used a tag on a scrapbook page?  Go share at Fantabulous Cricut this week for our final challenge of the year.  Happy crafting!

I'm entering this project in the following challenges:

BBTB2: Challenge - Winter Frolic Tag
CardzTV: Cricut Cardz Challenge #98 - Tag, You're It
Die Cuttin' Divas - Tags, Tags, & More Tags
Whimsical Designs: Whimsical Wednesday Challenge - Tags


Friday, December 16, 2011

Christmas Tree Panda Explosion Box

I have a big achievement this week -- I made an explosion box...!!!

I've always admired the explosion boxes I've seen others make, but I thought they were too involved and too complicated for me.  But with Christmas coming, I was inspired to make something special to hold gift cards for my son's preschool teachers.  This box has a red, green, and Christmas tree theme and also features a panda since that's the mascot for my son's classroom.  Here's the outside:


Open it up, and here's what's inside...


And a few closeups of the panels...


Project Details:
  • Papers - patterned papers from Recollections - Believe paper pack; solid cardstock by Recollections; gold paper by Creative Memories
  • Cricut Cuts - 3-D tree from Winter Woodland, page 73; panda from Create a Critter, page 58; scarf for panda from Winter Frolic, page 35; ornaments from Winter Frolic, pages 64 and 65; tag from Winter Frolic, page 65; "Christmas Wishes" sentiment from Winter Frolic, page 67; "A Gift for You" sentiment from Winter Frolic, page 43
  • Embossing - tree, ornament pieces, and outside side panels with Cuttlebug's Victoria
  • Other - ornaments inked with Colorbox red ink pad; gold curling ribbon from stash; sentiments on pop dots

I'm super pleased with the result and hope his teacher likes the way we presented her gift card.  The only thing I'd change is backing the patterned papers with cardstock -- it made the flaps a little too heavy to stay "exploded" when the box is open.  Next time, I'll either skip the backing and/or choose lighter-weight papers.

My favorite detail is how the scarf is curled to make it appear to be blowing in the wind.  It had a more utilitarian beginning, though -- I had to curl so it would fit in the box when folded!  I also like the holly paper I used on the inside panels.  It kinda looks like bamboo, which is perfect for the panda!

I hope you enjoyed my first explosion box -- it took three naptimes to make!  I'm entering this project in the following challenges:

BBTB2: Challenge - Winter Frolic Tag
Cooking with Cricut: Challenge #64 - Cards, Tags, & Gifts
Die Cuttin' Divas: Challenge #44 - Tags, Tags, & More Tags
Whimsical Designs: Challenge - Winter Fun

Thursday, December 1, 2011

Floral Celebrate / Birthday Card

I followed a fun sketch at Die Cuttin' Divas this morning to make a birthday card for my mother-in-law.  Here's my resulting card:


Card Details:
  • Card Base - Studio G (5x5")
  • Papers - patterns from My Mind's Eye: Simply Delightful; cardstock by Recollections
  • Cricut Cuts - flower from Forever Young, page 73
  • Embossing - black background and aqua flower center with Cuttlebug's Bloom Dots; pink flower petals with Cuttlebug's Musical Flourish; ribbons with The Paper Studio's Doodle Borders
  • Other - inking with orange Colorbox ink pad; flower, background, and sentiment on pop dots

I'm totally in love with these papers from My Mind's Eye and have been looking for the perfect card to feature them.  I think it turned out quite nice!

I'm entering this card in the following challenges:

Birthday Sundaes: Challenge #37 - Anything Goes
Die Cuttin' Divas: Challenge #43 - Weekly Sketch

Sunday, July 10, 2011

So Thoughtful Circle Card

Please don't be alarmed, but this post will be my last until next weekend.  A dear childhood friend and her three year-old son are coming to visit this week, so I'm in the process of packing up my craft goodies.  (Oh, how I wish for a craft room...)  If we need the guest room for my parents, I typically move everything to the living room since my mom and I would a-Cricut anyway.  But all these papercrafting tools are just too tempting for two little boys -- so into plastic boxes it all will go.

It's actually my first time to store everything since I began papercrafting.  Four months ago, it fit in one flat, under-the-bed container; now, I've got to make a Target run for at least two more boxes.  Wow...

But at least I'm going out with a bang.  I made one last card this evening, and I'm loving how it turned out:

Card Details:
  • Card Base - scalloped round card by Studio G (5" diameter)
  • Papers - all papers from My Mind's Eye: Magnolia; except green cardstock which is from The Paper Studio
  • Cricut Cuts - <flower2> cut from Simply Charmed, page 39, only base and layers 1 and 2; circle mats cut with Layer 3 of <flower2>
  • Cuttlebug Embossing - green leaves with Victoria
  • Other - petal and gemstone embellishments by Recollections; inking with red, orange, and green Colorbox ink pads; sentiment stamp by Studio G

I'm entering this card into the following challenges:

Cricut360:  Challenge #2 - Circle Thank You Card
Die Cuttin' Divas:  Challenge #22 - Sketch Week
M.A.G. Challenge by the Page:  Challenge #34 - Simply Charmed

Friday, July 1, 2011

Trike Twisted Easel Card

I made my first twisted easel card last night -- and it was so easy!  If you haven't tried this fold, I encourage you to give it a shot.

The video below was my guide, but there's tons of tutorials out there.  (Honestly, I chose this tutorial by Christina of Card Making Magic because of her super soothing voice -- it was 9pm and time to "wind down" for the day!  But now I've visited her website and really like the folding templates available there.)


Here's my resulting twisted easel card -- featuring a trike modeled after my son's new "ride" from his grandparents!


Card Details:
  • Card Base - twisted easel (5x5")
  • Papers - patterns from American Crafts - Play paperpack; cardstock from scraps
  • Cricut Cuts - all cuts from Boys Will Be Boys; trike, page 36; "zoom" sentiment, page 63 (Phrase/Phrase Layer)
  • Cuttlebug Embossing - blue background with Spots & Dots
  • Other - doodling with white Gelly Roll pen; inking with Colorbox orange and blue ink pads

I'm entering this card in Die Cuttin' Divas' Challenge #21: Planes, Trains, & Automobiles.  Yes, a trike isn't technically an automobile, but my toddler sure thinks it is!

Tuesday, June 14, 2011

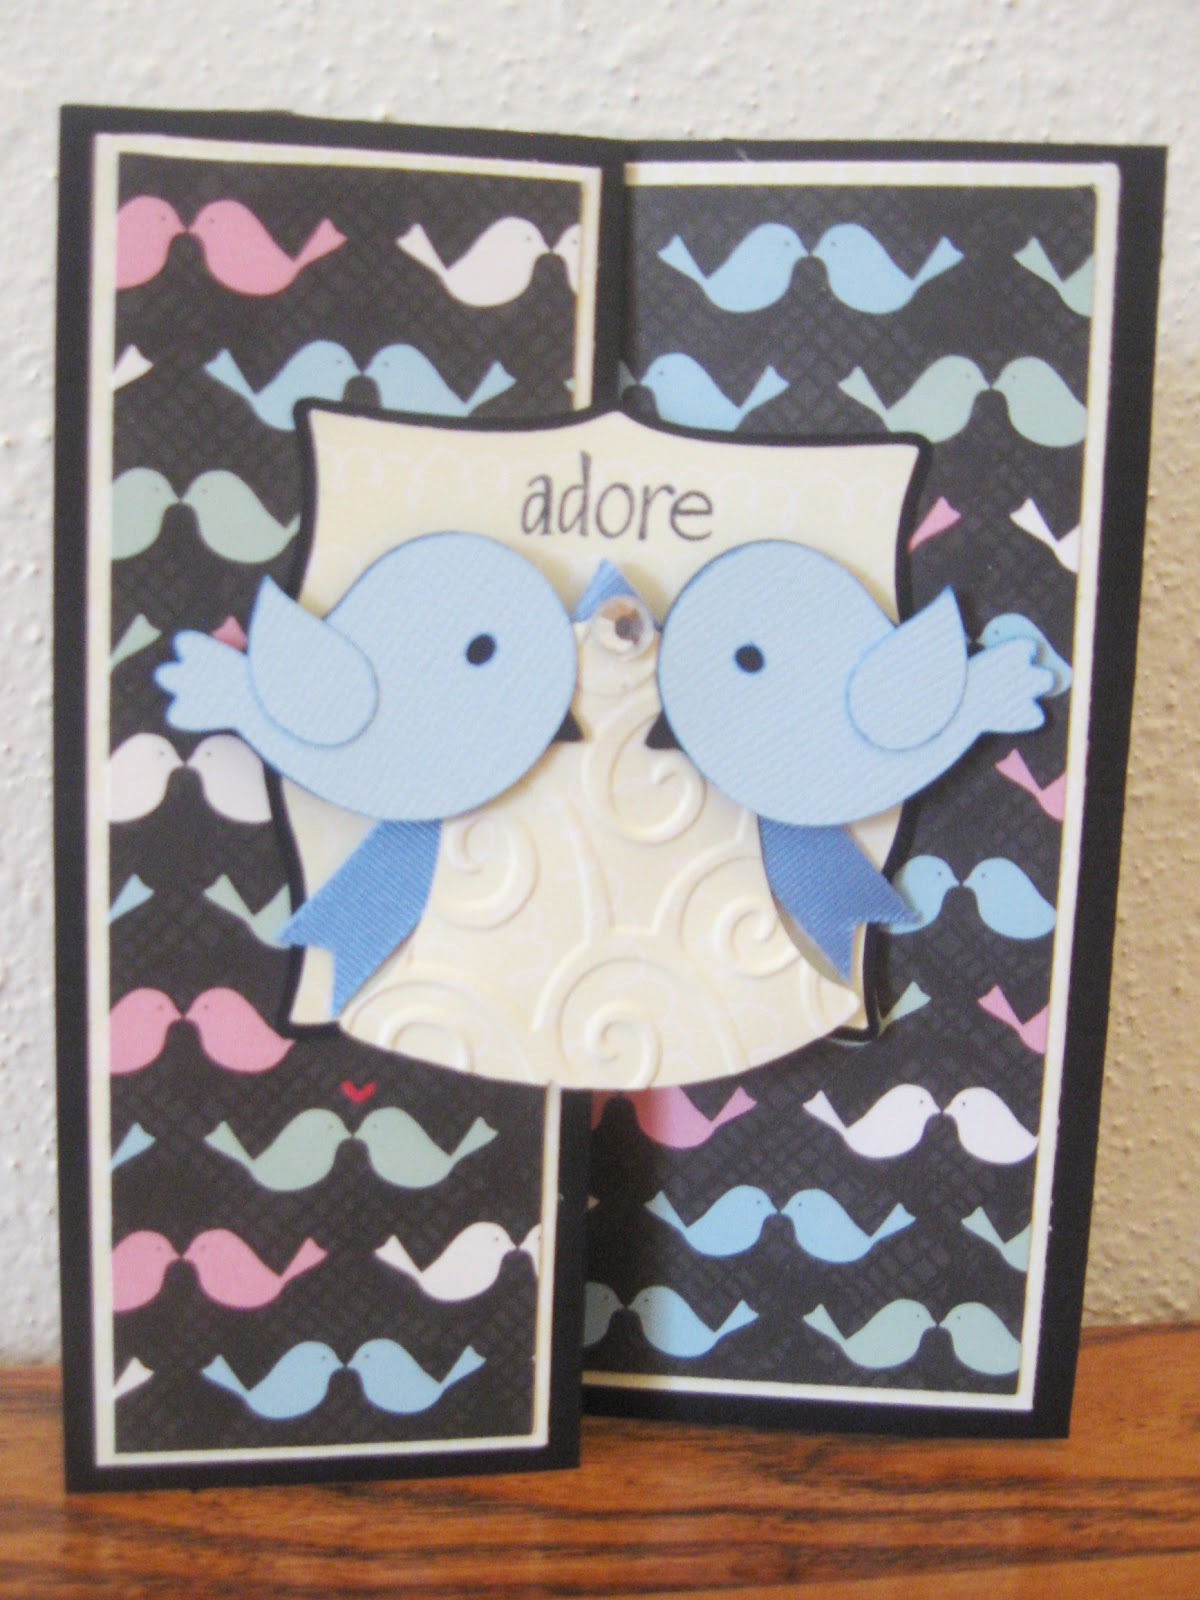
Adore Wedding/Anniversary Card

My blog may be quiet, but my Cricut hasn't been!  It's been frantically chirping with Fathers Day and birthday cards.  By this weekend -- hopefully -- I should be able to share a few "shh-shh" projects with you.

In the meantime, I can post a wedding/anniversary card I made this morning.  I've been dying to use this Heidi Grace patterned bird paper, and a card for two nature lovers was a good reason.  It's also two firsts for me -- my first Z-fold card and my first time to stamp a sentiment on the front!  Here's the entire card stretched:


And folded to view just the front:

Card Details:

  • Card Base - black cardstock (A6)
  • Papers - patterned and cream cardstock by Heidi Grace; blue textured cardstock by The Paper Studio
  • Cricut Cuts - scalloped background from Elegant Edges, page 51 (<btfly2_s>/Shadow); bird from Create a Critter, page 45, legs snipped and one image flipped; bell from Stretch Your Imagination, page 72 (Blackout), handle and heart snipped.
  • Cuttlebug Embossing - D'vine Swirls on bell
  • Other - ribbon by American Crafts; "adore" sentiment by The Paper Studio; gem from Michaels dollar bin; inking around edges of bird with sky blue Le Plume II marker

I'm entering this project into the following challenges:

Cricut Cardz Challenge #78 - Wedding Card
Die Cuttin' Divas: Challenge #19 - Wedding Bliss (without hearts)
Fantabulous Cricut:  Challenge #64 - Wedding Wishes (use white and a bell)
Paper Playtime:  Challenge #48 - Z-Fold Card

Sunday, May 8, 2011

Happy Cupcake Birthday Card

Happy Mothers Day!  I hope all you mothers and special ladies were honored by your loved ones with a special day.  My hubby and son took me out to lunch after church and gifted me with a new cartridge and embossing folder.  (They sure know how to support my addiction, huh?)

I'm also celebrating National Scrapbooking Day this evening, as -- more than anything else -- I wanted a "Mommy Timeout" so I could craft in peace for a few hours.  The result is a few projects from My Pink Stamper's NSD challenges combined with inspiration from sketch blogs.

My first creation tonight is a cupcake-themed birthday card made using my Mothers Day gift -- the Simply Charmed cartridge!  I love this cart already with all its happy faces and cute phrases.

Cartridges Used:
Lovely Floral
Simply Charmed

The cupcake is from Simply Charmed, and the side border scallop is clipped from a frame on Lovely Floral.  I printed the sentiment from my computer since I couldn't seem to find a phrase that looked good cut at such a small size.

I was also inspired by the Die Cuttin' Divas sketch this week, so I'm entering this project in the following challenges:

Die Cuttin' Divas: May 1st Sketch Challenge
The Pink Stamper: NSD Challenge #1 - Anything Cupcake

Saturday, April 30, 2011

Flower & Vines Mothers Day Card

Yep, it's another Mothers Day card!  Inspiration for this card was Card Patterns Sketch #113:


I made a few adjustments, but the result is my favorite card to date:

Cartridges Used:
Birthday Bash
Lovely Floral

I need lots of practice on bows, huh?  But it was nice to challenge myself.

I also used the Cricut's centerpoint function for the first time with this card.  The sentiment is printed from my computer on white cardstock and then inserted into the Cricut to cut a circle around it.  I'm going to try this technique again soon with something more complex.

I'm entering this card in the following challenges:

Celebrate the Occasion: Challenge #11 - Mothers Day
Die Cuttin' Divas: Challenge #12 - Mothers Day Is on the Way
Fantabulous Cricut: Challenge #57 - Mom's The Word
My Sheri Crafts:  Challenge #55 - Mothers Day

Friday, April 22, 2011

Twin Birthday Card #2

Here's the second in a duo of birthday cards for my friend's twin daughters:


Cartridges Used:
Birthday Bash
Create a Critter
Lovely Floral

This design is based on a sketch by Cherie at Sassy Lil' Card Sketches.  I'm entering this card in their April 14th Card Reveal challenge.

I'm also entering it into the Die Cuttin' Divas Challenge #11 - "Tag You're It" since the sentiment is featured on a tag.

Here's a shot of both cards together:


I like the result -- because twins don't always have to match. :)

Tuesday, April 12, 2011

Cubbie Thank You Card

Last night I worked on thank you cards for the volunteers who help me with Awana Cubbies (a preschool scripture memorization program) at church each week.  Our year will soon be over, and I'm planning to give these cards at our awards night.

I was inspired by the Challenge #9 sketch at Die Cuttin' Divas and the Awana Cubbies colors of red and blue.  Here's the result:

Cartridges Used:
Create a Critter
Opposites Attract

I think the bear on Create a Critter "bears" enough resemblance to our mascot Cubbie, don't you?


I have eight of these cards to make, so I'm keeping them uncomplicated.  I'm not totally pleased with the result yet, so I may add some doodling.  I'd like to make the blue outfit on the bear look like the uniform vests our Cubbies wear.  (If the results are good, I'll update the image.)

Saturday, April 2, 2011

Simple Easter Card

Is it really April already?  Easter is only a few weeks away, so I pulled out some pastel papers and played with a bunny cut tonight.

Cartridges Used:
Cricut Classic Font
Doodlecharms

I'm entering this card in my first challenge -- Die Cuttin' Divas - Hippity Hoppity Challenge #8.

I'm no where near as talented as these ladies, but ya gotta start somewhere, right? :)  For three weeks' experience, I like the results of this simple Easter card.

And before I call it a night (gotta get to Michaels for a fabulous sale tomorrow after church!), welcome to all the gracious and supportive ladies who've found my blog through Mrs. Glenda.  I'm in awe of all your talent and so inspired by your creations!