I'm so happy to be back! I had a great visit with my friend and her son, but I was eager to unpack and reassemble my craft area this morning. I think I was suffering from papercrafting withdrawal! My guys slept in, so I had time to make this clean and simple birthday card:
Card Details:
Card Base - DCWV Brights (A2)
Papers - green stripe from American Crafts Play paperpack; textured papers from Bazzil Bling; all others from scraps
Cricut Cuts - sundae from Birthday bash, page 57
Cuttlebug Embossing - whipped cream with D'vine Swirls; orange fruit with Spots & Dots
Other - ribbon by CelebrateIt Basic Narrows; sentiment stamp by Hampton Ink; inking with Colorbox orange and green petal point ink pads; doodling with white Gelly Roll pen
I love these colors -- I can almost taste the orange sherbert and smell the mint leaf!
I'm entering this card into the following challenges:
Please don't be alarmed, but this post will be my last until next weekend. A dear childhood friend and her three year-old son are coming to visit this week, so I'm in the process of packing up my craft goodies. (Oh, how I wish for a craft room...) If we need the guest room for my parents, I typically move everything to the living room since my mom and I would a-Cricut anyway. But all these papercrafting tools are just too tempting for two little boys -- so into plastic boxes it all will go.
It's actually my first time to store everything since I began papercrafting. Four months ago, it fit in one flat, under-the-bed container; now, I've got to make a Target run for at least two more boxes. Wow...
But at least I'm going out with a bang. I made one last card this evening, and I'm loving how it turned out:
Card Details:
Card Base - scalloped round card by Studio G (5" diameter)
Papers - all papers from My Mind's Eye: Magnolia; except green cardstock which is from The Paper Studio
Cricut Cuts - <flower2> cut from Simply Charmed, page 39, only base and layers 1 and 2; circle mats cut with Layer 3 of <flower2>
Cuttlebug Embossing - green leaves with Victoria
Other - petal and gemstone embellishments by Recollections; inking with red, orange, and green Colorbox ink pads; sentiment stamp by Studio G
I'm entering this card into the following challenges:
Guess what..? I made my first Christmas card with the Cricut last night...!!! Now I want to make handmade cards for everyone on our Christmas card list -- and then I realize I just might be certifiably Cricut crazy.
I used two of my newest cartridges -- Winter Frolic and From My Kitchen -- for this card:
Card Details:
Card Base - DCWV Brights (A2)
Papers - green polka dot paper from K&Company Yuletide paperpack; textured cardstock with shimmer is Bazzil Bling; all other cardstock by The Paper Studio
Cricut Cuts - gingerbread men and sentiment from Winter Frolic, page 61; spatula from From My Kitchen, page 44; holly leaves from Stretch Your Imagination, page 53
Cuttlebug Embossing - holly leaves with Victoria embossing folder
Other - pink gems from Michaels $1 bin; ribbon by Celebrate It! Basic Narrows; doodling with white Gelly Roll pen; inking with brown Stampabilities ink pad
I began following Sassy Lil' Card Sketches - July 7th Reveal exactly until I saw those nine gingerbread all in their rows. I immediately thought they looked fresh out of the oven, so I made a cookie sheet with two layers of gray/silver cardstock and rounded the edges. A spatula gives adds to the baking theme, and the holly makes it more Christmas-y since I did not use red per Celebrate the Occasion's Christmas in July (No Red) challenge.
I'm entering this card in the following challenges:
I'm so excited to be featured as guest crafter today at Carson's Creations -- many thanks to Georgiana for such an honor! If you've come from Georgiana's blog, thanks for visiting! If not, please visit Georgiana and check out her amazing creations.
I'm sharing one of my favorite craft projects with you today -- a diaper cake decorated with Cricut die cuts!
Diaper cakes are wonderful baby shower gifts. I was blessed by a diaper cake when my son was born, and I began making them for my expectant friends. I learned to make diaper cakes from this YouTube video by CreativeBabyShowers:
For this diaper cake, I chose a sea creature theme; it's the recipient's nursery theme and colors. Once you've made your diaper cake base as shown in the video, you'll need the following items:
completed diaper cake base
ribbons in two widths (Mine are 1.5 and 2.5 inches.)
die cuts (I used cuts from Create a Critter and Playtime cartridges; see end of entry for more details.)
floral stems or bush
double-stick tape
scissors
STEP 1: RIBBON
Wrap the wider ribbon around the diaper cake layers to hide rubber bands. Secure with double-stick tape placed along rubber band line every few inches. Repeat with the smaller-width ribbon layered on top of the first ribbon, again securing with double-stick tape.
STEP 2: DIE CUTS
Place your die cuts around the diaper cake as desired; secure to ribbon with double-stick tape.
STEP 3: FLORAL ACCENTS
Cut small sprigs from your floral stem or bush and use as accents for the cake topper and around the die cuts. Stems need to be approximately 3 to 4 inches long. Wedge the stems between or under the rolled diapers; do not use glue, as it will damage the diapers. I used a greenery bush that reminded me of seaweed to keep with the sea creature theme.
STEP 4: TOPPER
Secure die cut as topper of the diaper cake. I used regular transparent tape to fasten the die cut to a wooden skewer and stuck the skewer between diapers. But don't limit yourself to just die cuts -- I often use a small stuffed animal or teething toy as a topper.
And now you have a super cute diaper cake! Below are some close-ups of the topper and die-cuts for this sea creature diaper cake:
Cricut Cut Details:
All animals are from Create a Critter; frog, whale, seahorse, jellyfish, and octopus cut at 3.5 inches; turtle and fish cut at 2.5 inches.
Topper tag is <princess> and <princess_s> from Playtime, cut at 2.25 inches.
Letters for "LANDON" from Opposites Attract using Opposite font, cut at 1.25 inches.
Embossing for topper tag is Spots & Dots Cuttlebug folder.
Textured cardstock is Core'dinations; non-textured cardstock is from The Paper Studio.
Inking with cyan and green Colorbox petal point ink pads.
I've enjoyed sharing this project with you today. Thanks again to Georgiana for such a special honor! I'm really, really proud of how this project turned out, so I'm entering it into a couple challenges, too:
I hope you all had a great Independence Day! Our family had a relaxing day at home, and I had a little time tonight for crafting.
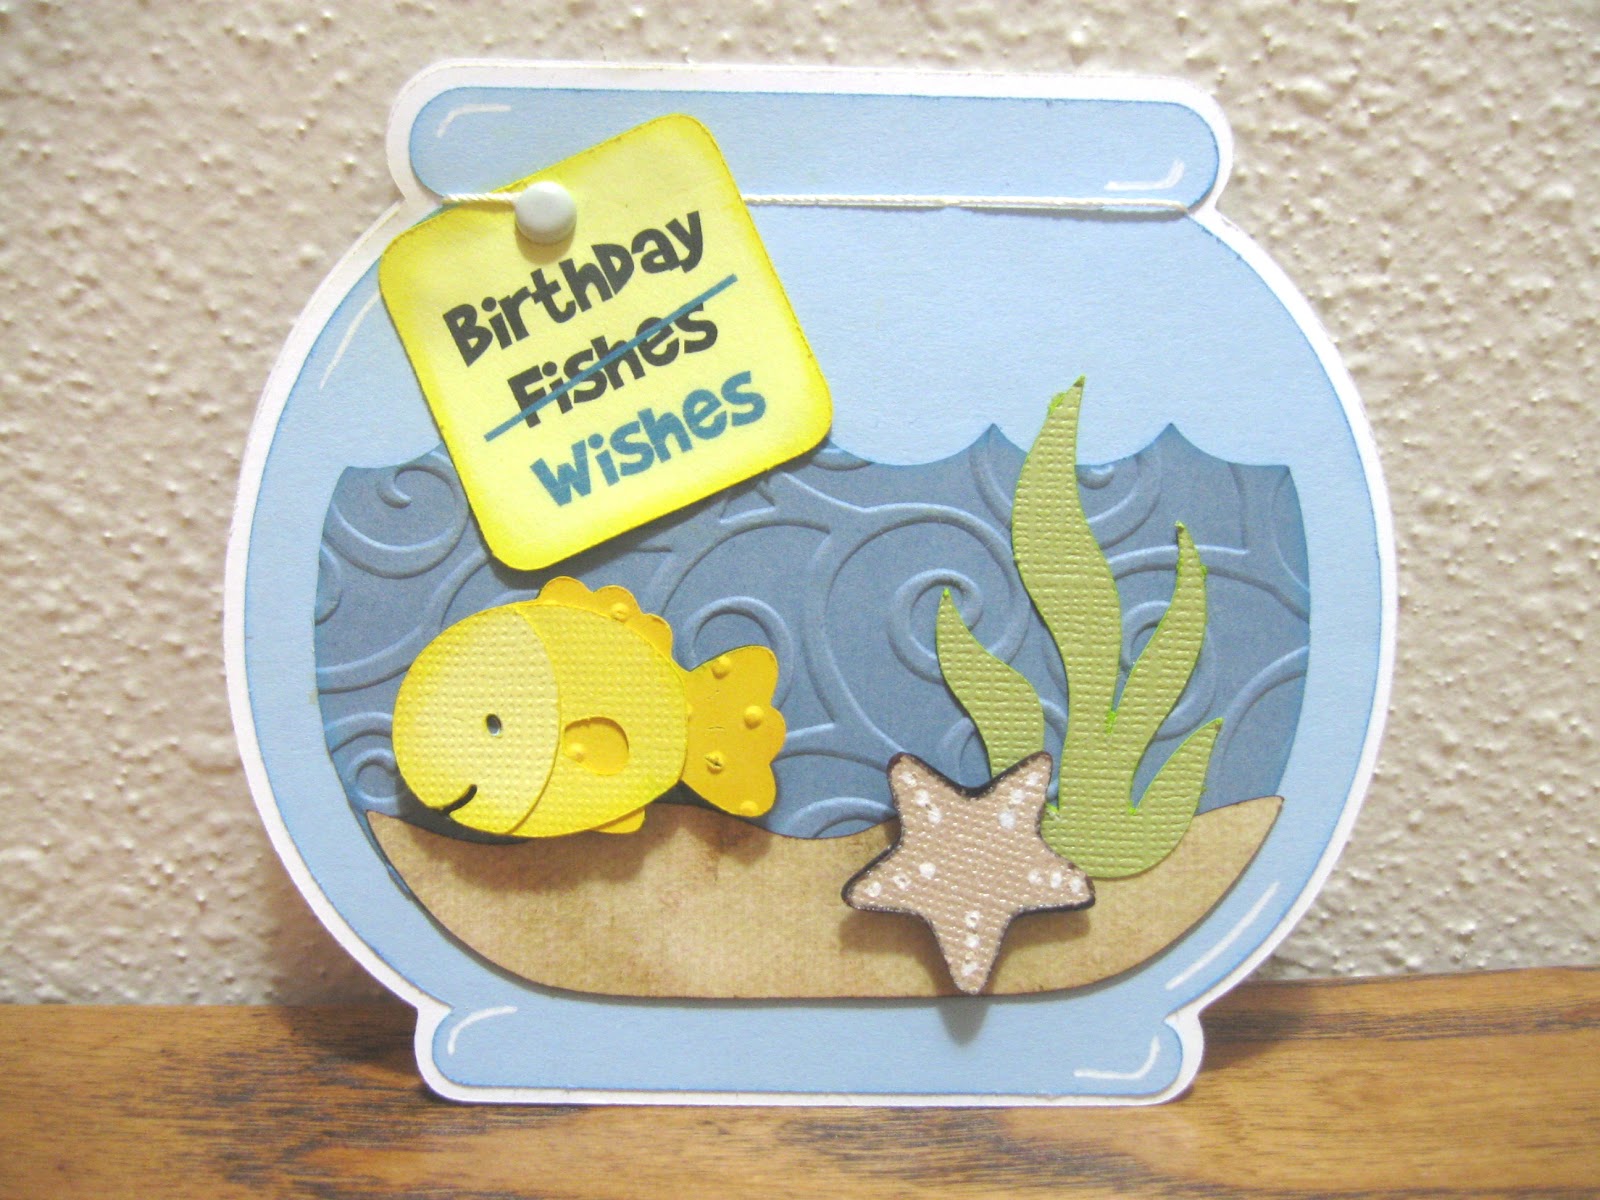
This card is for my father-in-law's birthday later this week. He enjoys tending his aquarium, so I decided to make him a fishbowl card.
Card Details:
Card Base - fishbowl from Create a Critter, page 43, cut at 4 inches; secured with brad
Papers - textured cardstock by Bazzil Bling; all other cardstock from scraps; distressed brown paper from My Mind's Eye - Simply Delightful
Cricut Cuts - from Create a Critter: fishbowl and fish, page 43; starfish, page 41 (accessory)
Cuttlebug Embossing - water with D'vine Swirls; fish (Layer 1) with Swiss Dots
Other - brad by 7 Gypsies - Angelo; sentiment printed from my computer; fish and starfish on pop dots; doodling with white Gelly Roll pen; inking with Colorbox yellow and cyan ink pads
Without a Gypsy, I can't make shaped cards too easily -- but my solution is making a card held together by brads. It's different, but I like it. :)
I'm entering this card into the following challenges:
Another cut I love from the Nifty Fifties cartridge is the ranch house -- it's just so cute! We live in a neighborhood built in the late '50s/early '60s with houses just like this cut; in fact, our home is pretty similiar -- just add another garage door and subtract the decorative cinder blocks.
This card is for a couple who just moved into their first home. We weren't able to attend the housewarming party, so I'm sending this greeting instead.
Card Details:
Card Base - DCWV Brights (A2)
Papers- patterned paper from American Crafts - Play paperpack; cardstock from scraps
Cricut Cuts - house from Nifty Fifties, page 47; "Congrats!" sentiment from Cricut Classic Font, page 66
Cuttlebug Embossing - blue background with Spots & Dots
Other - doodling with white Gelly Roll pen and yellow-green Le Plume II marker
The house has another layer for the white cinder block and window frame accents. But with the house cut at 2.25 inches, this layer was just too small and delicate. Instead, I doodled the accents with a white Gelly Roll pen and added shadow with a yellow-green Le Plume II marker.
Okay, no more cards until I do some chores around the house... :)
I made my first twisted easel card last night -- and it was so easy! If you haven't tried this fold, I encourage you to give it a shot.
The video below was my guide, but there's tons of tutorials out there. (Honestly, I chose this tutorial by Christina of Card Making Magic because of her super soothing voice -- it was 9pm and time to "wind down" for the day! But now I've visited her website and really like the folding templates available there.)
Here's my resulting twisted easel card -- featuring a trike modeled after my son's new "ride" from his grandparents!
Card Details:
Card Base - twisted easel (5x5")
Papers - patterns from American Crafts - Play paperpack; cardstock from scraps
Cricut Cuts - all cuts from Boys Will Be Boys; trike, page 36; "zoom" sentiment, page 63 (Phrase/Phrase Layer)
Cuttlebug Embossing - blue background with Spots & Dots
Other - doodling with white Gelly Roll pen; inking with Colorbox orange and blue ink pads